Kinemaster: Basic Video Editing Tutorial for Beginners
If you are fond of editing various videos, then you are most probably familiar with the Kinemaster. Various users widely use this leading video editing app because of its easy interface and significant features. By using this app, you can transform videos into a professional audio-video presentation in the easiest way possible.
Moreover, this powerful video editor is free to use and download. However, videos that are edited from the free version have the Kinemaster watermarks. If you want to remove the watermarks, you can get the paid version of the app for ₱ 1,764. If you are looking for a not-so-complicated video editing tool, Kinemaster is suitable for you.
Image Source: Kinemaster Tutorial
Editing Videos Using Kinemaster
This editing app is highly recommended for beginners who wish to learn how to do simple video editing. On the other hand, professional editors will also enjoy the easier features in the Kinemaster app.
The first step is to download it and install the Kinemaster app on your PC. Once installation is completed, you need to click the “Create New Project” button and choose a video from the gallery you wish to edit.
Creating a New Project
Here are the steps on how to create a new project on Kinemaster;
- Click to open the Kinemaster app.
- Click on the “New project” button and choose your preferred aspect ratio of the project. The aspect ratio of the project depends on the purpose of your video—for example, 16:9 for Youtube, 9:16 for Instagram stories.
- Once done, you will see the working space where you will implement effects, adjustments, and more to your video. You can add audio, voice, multiple layers, and even media to your project in this space.
- To import files you wish to work on, and you can click the media button.
In Kinemaster, it is not necessary to work with moving videos all the time. This app allows you to edit various types of media, such as images. For multiple pictures, you can create a beautiful audio-video presentation with transition effects and music as well.

Image Source: Kinemaster Tutorial for Beginners 2
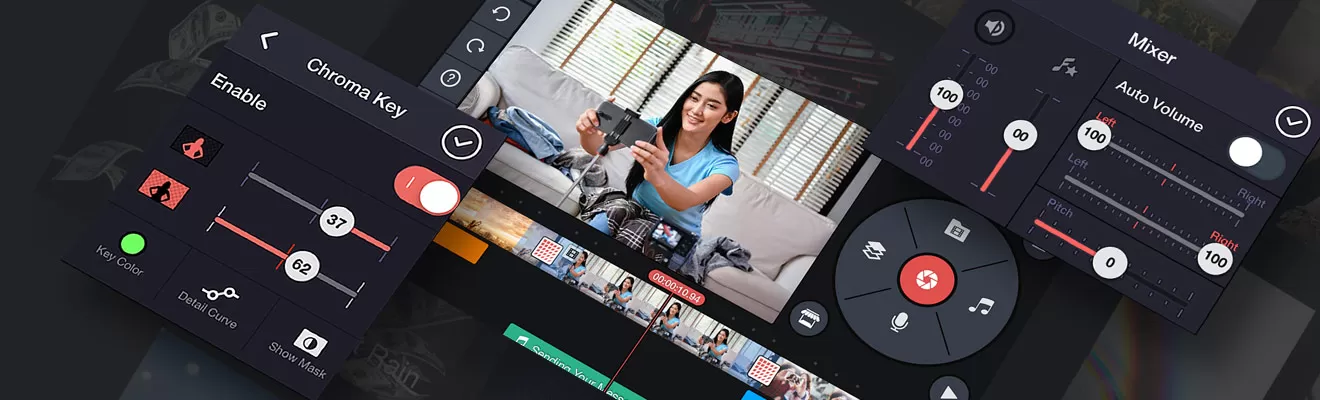
If you wish to import media to your current project, just notice the yellow frame on the lower part of the screen. Moreover, you can also try other editing options, such as trimming. Just look for the scissors icon in the app to cut your video’s duration. You can also rotate, and speed up your video by clicking the rotate/mirroring and speed buttons, respectively.
Trimming Videos on Kinemaster
These are the basic steps in trimming a video on this app;
- Choose the video you wish to trim, by clicking the video duration in the lower part of your app screen.
- Once done, the video will be highlighted in yellow. Then, click on the scissors icon located at the right part of the menu.
- Explore different options of trimming.
- Choose how you want your video to be trimmed. Split at playhead, left of playhead, or others.
- Once done trimming, click the checkmark on the upper menu to save

Adding Transition on Kinemaster
If you want to achieve a smooth video transition, you must know how to do it using Kinemaster. Here are steps in adding transitions in this app;
- First, grab the media you wish to add a transition effect.
- Once done, choose the gray square in-between spaces.
- Choose from the available transition options. Click one and check if it fits your video presentation. Use the preview feature to check how it will turn out.
- Once done, click on the checkmark in the upper corner to save your file.

Adding Text on Your Project
If you wish to add some text to your project, it is also possible for Kinemaster. Here are the steps;
- In the main menu, click the layer icon and import the video of your choice.
- On the menu, tap the text button.
- Enter the text you wish to add.
- Click OK.
- Upon clicking the OK button, your text will be displayed on your video. Start to modify its size based on your liking.
- You can edit its font, color, background, and animation effects by clicking the button at the right part of the working space. You can explore and use other effects that can fit your video presentation well.

Image Source: Kinemaster – How To Add Subtitles Or Text In Any Videos
Adding Voice & Music
To add music to your project, you need to follow these steps;
- First, ensure that your preferred song is available on your PC.
- Then, from the main tool menu, click on the music icon
- From there, select the song you want to use for your video and confirm it by clicking the red plus button.
- Once done, the audio file will begin to play as the video starts.

Image Source: Kinemaster – How to add music & sound effects
Moreover, if you want to add some voiceover to your video, you can check out these instructions;
- From the main tool menu, click on the microphone icon.
- Click start to begin recording. Once you start recording, you will notice a green light glaring.
- As you record your voiceover, you can check out what part of the video it covers by looking at the highlighted video duration in red.
- Once finished recording, click stop, and the red highlighted part on your video will be highlighted with purple color this time.
- For sound effects, you can increase the audio volume or utilize a voice filter on the right part of the audio menu. If you think your recording is not effective, you can record it again.
Kinemaster is a straightforward video editing application perfect for beginners as well as professionals. It enables every user to create, edit and modify impressive media such as videos. No doubt, this guide will help you a lot, especially on how to use this ideal application on your PC.


Latest Articles